FOR SALE

Sunday 29 November 2015

If we have to have winter.....

....then I'm more than happy to have a winter with weather like we're currently having!  Today was another beautifully sunny day, and once again we were able to go for a nice morning walk along the beach before having a coffee at a cafe on the promenade.  This week we went to Algarobbo Costa which is about 20 minutes east along the coast from us.  Algarrobo has a dark sandy and stony beach and is more residential than a holiday resort.  It was lovely this morning, quite a few people were walking, jogging or cycling along the promenade or sitting chatting at one of the several cafes.

If you're interested in reading about this interesting area, more information can be found here:

The Village of Algarrobo

Looking back towards the mountains, the ancient tower you can see  one of the two ancient watch towers in Algarrobo:

 
The Mediterranean was particularly calm today!


Looking along the coast towards Torre del Mar and Malaga....


I particularly wouldn't mind living in one of these houses, facing straight on to the beach....perfect!


Banana trees growing on the beach...


Lovely tall palm trees swaying in the breeze....


And plenty of seagull footprints in the sand!


I decided it was Nuria's turn to come with us today, but little Toddler Teddy insisted that he had to come too!  So the two of them got ready and off we went!  Most of the photos are of Nuria as poor little Teddy is a bit unsteady on his feet! ;)


"Mama, why can't we go in the pool?"  


This lovely tile 'mural' was on the wall of a restaurant.  The kids wanted to pose in front of it as it was so pretty.


I hope you have enjoyed this little stroll along Algarrobo Costa with us, and hope you all have a lovely week ahead!

(Sasha's lovely smocked top and shorts are by Marilyn Hotchkiss and along with her straw hat (from Sasha Morgenthaler Harlequin) were bought at the Chat n Snap last month, her pretty white leather sandals are by Marti Sanders Murphy.
Toddler Teddy's gorgeous cardigan was knitted for him by Rosie Laird, his shoes are by Lisa Hartley.
Teddy's shorts and cap, and both kids' striped socks, are all made by me).


Monday 23 November 2015

Another sunny Sunday, another sulky face!

Yesterday was another bright sunny day and except for a bit of a chilly wind coming down from the north, it was quite warm too, particularly if shielded from the wind. 

So we decided to go for a little walk on the beach and I thought I'd take one of my dolls along for the 'ride'.


I thought Valentine might be happy to get out and get some fresh air.....well how wrong can one be!!  She was not a happy bunny, preferring to sit in front of the television and play on her Playstation......

I think the look on her face says it all!!!


I hope everyone had a lovely weekend and that the week ahead is good for you all.

Thanks so much for visiting!


Tuesday 17 November 2015

Oh Brother! A lovely new embroidery machine!

My wonderful, kind and generous hubby, recently bought me a lovely new sewing machine that also does embroidery!  I had been telling him about it, having seen it in a sewing shop in the UK whilst I was over there.  He suggested that I might like it for a combined 10th wedding anniversary/Christmas present!  I gave it quite a bit of thought because it was expensive and I wasn't sure how much use I'd get out of it.  However, because this particular model can also be used as a regular sewing machine, I decided that I would love to have it and so it arrived last week!

It's a Brother Innov-is 955 sewing/embroidery machine and came with:

• LCD touch screen
• Automatic needle threading
• Extension table
• 296 embroidery designs
• 129 utility and decorative stitches

You can also download designs from the net, I have so many ideas!!!


Brilliant eh!  I did a bit of research on how to buy the machine because Brother no longer has a distributor on the Iberian peninsular, however they do have an agent based in Valencia who was really helpful and they got the machine to me in record time.  Because I'm in the middle of a big commission I wanted to wait until I'd finished it before getting involved in trying out the embroidery function of the machine, I've not tried that facility yet....but I'm gathering all the necessities so that very soon I can have a go!  I'm very excited about it and I'm hoping it will be the perfect machine for making doll clothing with embroidered designs on!

So watch this space!

And so that this is not a completely non dolly post, I thought I'd share a couple of photos of Emily, my Gotz Happy Kidz, who wanted to have her photo taken with this monster truck on Sunday as there was a car show locally:


And because she looks so small in that photo, she wanted me to take a close up of her in another location so that you could see her cute outfit that I bought last month from My Doll Best Friend, it has the cutest Pug wearing earphones on the front and came with the printed leggings!  I bought the knitted hat locally, it was actually made for a premature baby!  And the boots were already hers!


Thank you for stopping by my blog, I hope you all have a great week!


Friday 13 November 2015

A Journey Girl Kyla from Toys R Us.....

When I was in the UK, Dee very kindly took me to Toys R Us after the Chat n Snap and before we went for our lovely Italian meal.  I wanted to have a look at the play dolls called Journey Girls which are exclusive to them.  Although the Stevenage Toys R Us didn't have a very big selection (I understand this is not uncommon in the UK, compared to the US stores who have loads of dolls and outfits available),  I decided to get a tanned skin Kyla because I'd been looking at her on the internet.  At £30 each, I thought this doll was a good candidate for a 'makeover' because as I've mentioned previously here in my blog, I really do enjoy customising dolls.

I won't do a box opening because I left all the packaging in the UK, but will just show you the dolls face before and afterwards.  I had thought about removing her eyes before working on her, not to replace the eyes, because I wanted to keep them as they are pretty, but to make it easier using the sealant on her face, but having discussed it with the owner of Journey Girl Adventures Blogspot I decided to leave the eyes in place and just cover them.  This made attaching new eyelashes a bit more of a challenge but I was able to do it in the end!

Journey Girls are about 18 inches tall and are made of vinyl except for their waist, hips and bottom area which is made of cloth.  They have the usual 5 points of articulation and the head can be moved up and down slightly.  Their hair is rooted and in the case of my doll is very soft and silky.  I like that the doll has a vinyl chest plate, she looks so much nicer in strappy tops and anything that has a slightly lower neckline.  If there's one thing I really cannot stand and that is where a soft bodied doll has an outfit that shows their cloth body!

So here are some before photos.  The first photos show her as she came, you can see that she is already a pretty little thing!   Her lips were quite 'solid' and dark, a sort of dark plummy colour.  I didn't think they looked horrible but I just wanted a different colour with more definition.


Here you can see a close up of her lips:


I also wanted to do something with her eyebrows which were very simply done, with thin 'hairs' going in one direction and very sparsely drawn.  Also her eyelashes were the stiff plasticy ones that a lot of play dolls come with.  I decided they needed to go too.  I like her eyes, they are acrylic but are very detailed and a pretty colour which really suits her:


I wanted to keep her eyebrows in the same position so decided to enhance them rather than start from scratch.  Here she is with her eyelashes and her lip paint removed:


As you can see she has tiny bottom lashes and, as well as the plasticy lashes that I'd removed,  she has some painted on upper lashes too.


Before using any sealant I covered her hair with a plastic bag to protect it and then put some masking tape over her eyes.  If the sealant were to go on the acrylic eyes it would make them very dull, which I didn't want!


I intended taking photos as I went along but as luck would have it, a friend of ours arrived and I forgot!  So I will tell you what I did and show the final results.

After spraying the dolls face with a thin layer of sealant, (I like to use Mr Super Clear Flat but be sure to always use in a very well ventilated area.....I only ever use mine outside) I used a deep brown artist quality chalk pastel and a thin brush and filled in the eyebrows with shading.  I wanted them to look denser, like real eyebrows.  Normally at this stage I would spray again with sealant but I wanted to keep the layers to a minimum as the sealant can make the darker vinyl look paler and I didn't want to risk that.  So then, taking a very sharp watercolour pencil, I added extra eyelashes, drawing the fine lines in a different direction to the existing eyebrows.

Then using a black watercolour pencil, I added more bottom eyelashes (I am actually going to add some more tomorrow but took the 'after' photos prematurely!).

I used finely shaved chalk pastels to shade the lips, I used several shades of reds and pink and built the colour up in layers.  I added a little bit of white to the middle of the top and bottom lips.  I then added fine lines in white watercolour pencil, these are supposed to replicate the lines in human lips! ;)  I dusted the lips again with rosy shades just to soften the pencil lines.  I didn't want them to look too 'obvious'.

After I was happy with the lips I blushed her face, again using fine chalk pastels.  I used a flat but wide brush and did the usual places, chin, bridge of nose, forehead, temples, around the nostrils (just a little, you don't want your doll to look like she has a cold) and finally the cheeks.

Once I was happy with the depth of shading and blush, I sealed it all again.

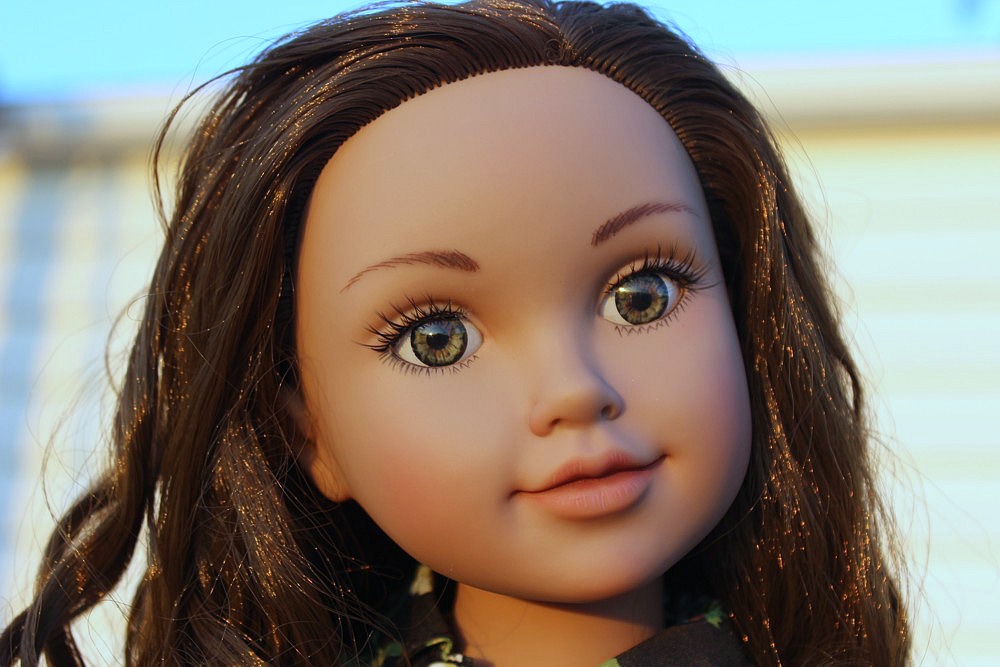
And finally I added human false eyelashes.  One human eyelash strip will do the two eyes, you just fold it in half length wise and cut in half.  I used Ailene's Tacky Glue and used the tiniest bit on the innermost edge of the upper lids, let the glue go slightly tacky and then apply the lashes with a cocktail stick.  Any glue that got on the acrylic eyes was easily wiped away with a cotton bud.

And here is the end result, I hope you like how she looks!  She is wearing a Gotz outfit that I got on Ebay last year.  I think it suits her.  Her sandals are her default ones, I didn't have shoes that both fitted her AND went with her outfit!  (The lines you see on her face in some of my photos are just shadows from the fence, which unfortunately were unavoidable when the sun was low in the sky this evening, but I thought I'd use them regardless!)


I hope you've enjoyed seeing Kyla getting her makeover.  She was fun to do and I'm happy with how she has turned out!

I hope you all have a lovely weekend, thank you for visiting!


Tuesday 10 November 2015

Wedding dress hunting in Sevilla.....

No dolly talk today but I thought I'd share some photos taken yesterday on my iphone, whilst in Sevilla.  My son Brendan's fiance, Virginia, is over here in Spain for a week on the hunt for her wedding dress.  Because she and Brendan are now living and working in the UK, but they're getting married here in Spain, she is doing as much as she can well in advance of their September wedding, so the dress was high on the agenda.

Obviously no photos of the absolutely gorgeous dress that she's ordered, you'll have to wait until next September to see those, but just a few general photos of Sevilla.  It was another gorgeous day, the temperature was 26C all day and there were so many tourists about wearing shorts that you'd have thought it was a summers day and not November!!!

I didn't enhance the colours at all, the sky really is that blue!

The lady shoppers!!  Left to right: Rosario (Virginia's grandmother), Virginia, yours truly looking fat, and Mari Carmen (Virginia's mum):


From the car window:


 Sevilla has some beautiful architecture:


The horse 'taxis', which take tourists around the city, are very popular as a mode of transport!


The Gothic cathedral of Seville, which is the biggest Gothic Cathedral in the world and the third biggest church in the world.   Construction on the cathedral began in 1402 and continued until 1506. The remains of Christopher Columbus are entombed in the cathedral.  


Below, the Giralda tower, which is a bell tower of the cathedral, is 104.1 metres (343 feet) tall and was originally built as a minaret during the Moorish period,  with a Renaissance style top subsequently added by Spaniards.  Construction began in 1184 and were completed on 10th March 1198.  If you're interested, more information can be found on the internet!


Some 'headless' street buskers! 


Virginia on the left with her friend Elena, a lovely girl who is going to be one of the bridesmaids.  Brides don't usually have bridesmaids here in Spain but Virginia is bringing some British traditions into her Spanish wedding!


Elena, on the right, loves to dress as a 'goth'.  When asked if she preferred any particular colour for her dress I thought she might suggest black....fortunately she said "please, any colour BUT pink!!"

The envelope contains the receipt for the deposit from the wedding dress store!!! 


One of the entrances to the cathedral.  It actually has fifteen doors on its four facades!


The 'turrets' of the cathedral: 


I believe the building below is actually just a very attractive apartment block!  


Well I hope you've enjoyed this very very small tour of central Sevilla, here in Andalucia. 

I hope everyone has a lovely week!