
What you'll need:

This is just a guide to what you'll need, and most people will already have a lot of these items.
Masking tape
Cling film (transparent sandwich wrap)
Sharp craft knife
Straight pins
Scissors
A pencil or pen
Craft glue which I will speak more about later (ignore the Tacky Glue in my photo above, you don't need that!)
A small piece of cotton fabric
A piece of paper to draw a pattern on
Sewing needles, preferably designed for sewing leather
Thread to match your lambswool
A piece of lambswool or you can also use faux fur
A doll as your model!
Firstly we're going to make a pattern, if you already have a pattern for your particular doll then you can skip this bit, but I didn't so had to make one.
Taking a piece of cling film/sandwich wrap, cover your dolls head and face right down to the neck, tie something around her neck to keep the film in place, pulling it down nice and tightly. This really is to protect your dolls face and forms the basis of the wig pattern.
(Don't worry, she won't suffocate as she is not really real! ;) )

Then you want to start applying the masking tape, tearing it into thin strips, you wind the tape around the dolls head covering the cling film. I usually start at where I want the hairline to be.

The great thing about masking tape is how stretchy it is, so you can easily stretch it around the tops of the ears, as shown below:

Take it down low at the back, to where you would like your finished wig to sit. You want it just low enough that it sits naturally without folding or bunching up if the dolls head leans back:

And across the forehead at the front:

And over the top too. You want to cover the whole head with tape and a few thin layers work best:


Don't worry if yours doesn't look too neat, don't forget I've done this before!
At this stage, before you remove the newly formed wig cap from the doll, you want to mark out where you want to cut the pieces. Using pencil I've marked roughly where I'd like my seams to be on my finished wig. I've also marked the pieces with F for front and B for back. You'll see that I've gone from the forehead, roughly a few millimetres in from the end of each eyebrow and then up and over the top of the head and down the back. You don't want your centre piece to be too wide, so if you feel your own head towards the crown, you probably have sort of 'corners/ bumps' roughly above your ears at the crown? You want to pass through those on your doll.....if they have a name I'd love to know it!!!

It doesn't matter at this stage if those lines aren't perfect, you can see that I've redrawn mine a bit higher in the photos below:

Mark each piece with back and front, it just makes it easier when the pieces are cut out:

Now we're ready to remove the masking tape 'helmet' from the doll, so just carefully snip into those back seams a little, just enough at this stage to pull the cling film off the dolls head. Below is what it'll look like.

Then trim all the cling film off from around the edges, only leaving that which is inside the 'dome' underneath the masking tape.
The photo below is of no importance whatsoever in this 'tutorial' but I thought Ellie looked quite cute.....like the Mekon in the Dan Dare stories, only not green and not evil!!

Now you want to take those scissors and carefully cut along the lines that you've drawn on your masking tape 'wig cap'..... the centre piece is a bit bumpy because it is moulded from the rounded part of the top of her head, but just flatten it down nicely and you now have your three pieces which will now become the basis of your pattern:

If you're confident about adding seam allowances as you go along then you could use your template above as your actual pattern but if like me, you are prone to gaily cutting away and then afterwards remembering the seam allowances....or lack of them, you might prefer to draw around the above pieces onto ordinary paper and then add your seam allowances on to the pattern before cutting it out. You will need seam allowances on both sides of the top centre piece as well as the front of it, and the same goes for the two sides, along the top curved edges and then along the straight bit leading to the curve which goes around the ears. I've added about 5mm but you could get away with less. You don't want to have to trim the seam allowances after you've sewn your wig together, so use as small a seam allowance as you feel you can cope with.

Cut out your pattern and then at this stage I suggest making a cap in a scrap of fabric so that you can check your fit.

I used a piece of ordinary cotton fabric, mark your 'front' and 'back' and then sew it together.

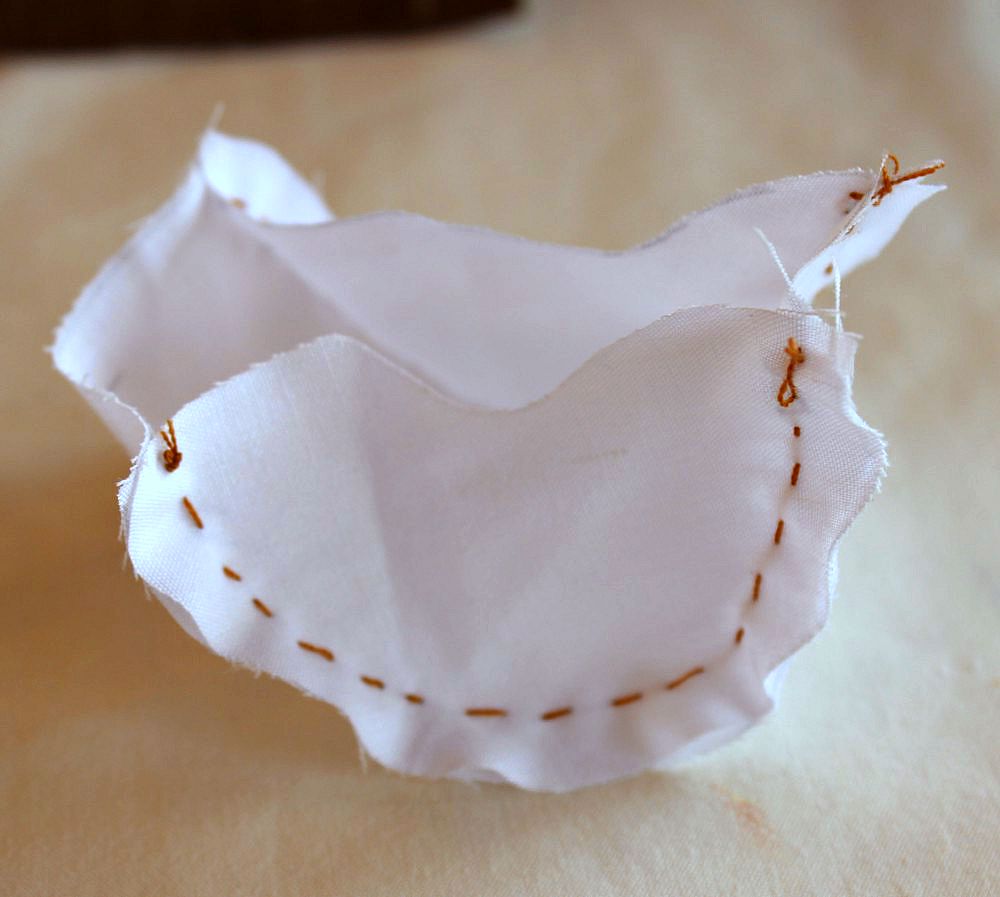
You can see that the fit is good on Ellie so now I can proceed. Awww she looks like a little Novitiate!

It was at this point I decided to make the centre part of the pattern into two pieces for a better fit at the crown. I forgot to take photos of where I marked the cutting point in the pattern, so I will explain it. Going back to those 'corners' on the crown of our heads, I just cut straight across there on my pattern. I then retraced those pattern pieces onto paper and added a seam allowance to the cut edge.
Below is the piece of lambswool that I'm going to use. It is lovely and curly and measures 16cm wide by 11cm deep. This is just big enough for a size 7 inch wig. Anything bigger and you'd probably have to get a seamed piece. This piece is seam free but if you get a piece that has a seam it isn't a problem and the wig can be made in just the same way. I got mine on Etsy, from FUNwithTROLLDOLLS, this seller ships very fast from the US and doesn't charge a fortune for shipping either.

Lay your piece of lambswool down with the skin facing you. You want your curls to be lying in the natural direction of growth as this will determine how you lay out your pattern pieces:

The two side pieces are laid out with the hair falling below them, just as natural hair would look at the sides, and the other two pieces, the centre front and centre back, are laid out so that the hair goes towards the front in both cases. I hope you can see in the photo below what I mean:

As my pencil didn't show up well on the skin, I used a biro and drew out my pattern pieces.

Then using a very sharp craft knife I carefully cut around the pattern, you don't want to cut off the hair, you're almost 'scratching' the skin rather than digging deep into it with the knife. So carefully cut around all the pieces and then pull them away from the skin, the hair should just pull apart from the rest and not tear or be cut away. You can see below that the cuts aren't really deep, they are slightly ragged as I've torn the 'cut' pieces free.

We now have four pieces of the wig, a left side, a right side and the two centre pieces, 'CT' below is for 'centre top':

Now it's time to start sewing up the wig. You will need to use a strong sharp needle and thread that matches the colour of your lambswool. I used brown thread and a needle designed for leather. Taking the two centre pieces you want to line them up and sew them together, leaving the seam allowance. Try to keep as much of the lambswool pushed down between the skin as possible as this makes it easier to sew. It was at this stage, having stabbed myself three times with the leather needle (yes, it works really well on skin too!) I decided to go over my hand sewing with my sewing machine. Again, if you are going to use a sewing machine, use a special needle designed for leather as other needles might break or damage your sewing machine.

Once you've sewn the two centre pieces together at what will become the 'crown' of the wig, you want to pin your sides in place. You have to carefully pin so that the curves match and your front and backs line up.


Once you've sewn your side pieces to your centre piece, turn the wig the right way out and try on your doll. Yes, sweet little Ellie IS in there somewhere!!!

Now you want to glue up the seam allowance along the front of your wig, all the way around from in front of one ear to the other ear. Turn the seam allowance to the inside, and hold it there until glue has dried. You are basically making a neater edge to the front of your wig so that when the hair is styled to one side you don't see the skin of the lambswool.
You will need to use a glue that isn't going to come undone if the skin gets damp, I used Beacon Fabri-Tac which I bought on Ebay UK. It can be used for lots of craft projects and is a permanent adhesive, but I do believe you can also use a hot glue gun and glue sticks.

Try to keep the glue from spreading into the hair, but if a little bit does go into it, you can carefully snip off the affected hairs, as long as it's not great clumps that you're removing!!!

Once the glue is dry, which with the Fabri-Tac was pretty quickly, I sprayed my wig with plain water and just shook it out to separate the curls. You don't want to drench the skin itself in water, just the curls. And then you put the wig on your doll and style as you wish!!!
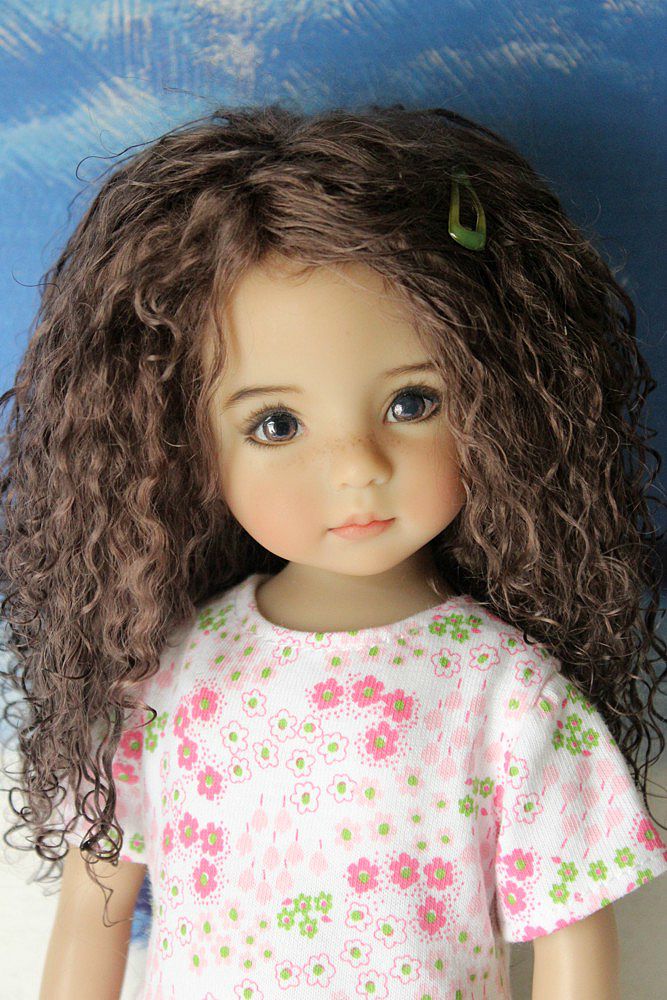
And here you have it! The finished wig being modelled by Ellie my beautiful Little Darling, hand painted by Dianna Effner!


I hope that this tutorial on how to make a lambswool wig has been useful, I do sometimes struggle to explain things so hope it's also easy to understand. If you need anything clarified, please either leave a message below for me or email me on dambuster0662@gmail.com.
Thanks very much for looking, I hope you all have a lovely week ahead!
This is amazing. Thank you so much...Mimi
ReplyDeleteYou are very welcome Mimi, I'm glad you enjoyed it!
Deletexxx
Will try this on my Gègè doll, which I've had for 60 years. Her hair is falling out fast
DeleteFantástico!!!!!Amei!!!!
DeleteIs your doll a composition doll?
DeleteLike the ones from the 1920 -30 and40s?
I have an EffanB Sweetie Pie that I need to make her a new wig.
I need to also find the type of skins used here.
I feel lucky to find this information.
Thanks all🤗
This is such a fantastic easy-to-follow guide - thanks for sharing it! And that wig turned out beautifully. :)
ReplyDeleteThanks so much jSarie! I'm glad with how it turned out, I want hair this curly myself!!!
Deletexxx
Wonderful Sharon! You are just so amazing with all these things you know! Ellie looks Gorgeous in the new wig, I will definitely try having a go at making one for my little darling CJ .
ReplyDeleteThank you so much for showing us how to make one. It's surprising how many people don't like to give any details to people and like to keep all the information secret.
You are a generous and lovely person BIG hugs Dee xxxx
Aww thanks so much Dee, I'm glad you enjoyed it and thank you also on Ellie, I'm not sure she'll keep this one but I do like it on her.....it may go to one of the new girls.
DeleteI think you should definitely have a go, it's fun and rewarding!
You are really very sweet and kind :)
xxx
Sharon, you are a magician!!! What a fantastic job!! I am lost for words!!
ReplyDeleteAnd sharing your art and talent is so generous! You are indeed a precious person! <3 <3 <3
Thank you very much! You are very kind and I hope you'll have a go at it too!
Deletexxx
Oh my gosh, now I can't wait to try this Sharon! Thank you so much for making this tutorial - you make it look easy! I am sure it's not, but you did a great job at making it look that way! You may be hearing from me for HELP! LOL Thank you again!!!
ReplyDeletePhyllis
Thank you very much Phyllis, I hope you will try it and have fun doing so :)
DeleteAnd I'm never far from the internet (addicted I think) so ask away!
xxx
You did a great job Sharon ! I' m quite near to try it.
ReplyDeleteThanks for your step- by - step.
Ellie is always so Beautiful.
Mercie Sophie, I'm glad you enjoyed it and hope you will have a go at making a wig for your LDs too :)
DeleteAnd thank you on Ellie too, she has a very photogenic face, doesn't she!!
xxx
This tutorial is very clear Sharon, thank you for sharing this! I might try this in the future, the result is beautiful! Have a great week! Hugs xx
ReplyDeleteYou're very welcome Linda, I hope you will try it, it's fun and very rewarding to make a wig, never mind the fact that it works out much cheaper than buying one ready made.....
DeleteI hope you have a great week too :)
xxx
Hi Sharon, that was just wonderful ...I'm so impressed . Not to worry...your directions were really very clear. Excellent job and your finished wig is just adorable! Fantastic job!
ReplyDeleteThank you so much!
Thank you very much Kathie, I'm glad you enjoyed it and found it easy to understand.
Deletexxx
Wonderful post Sharon and thank you so much for sharing! Even I, with very little crafting skills, thought I could follow your directions successfully each and every step though once you began to sew the leather pieces together, I thought that I might have trouble with that part! If you are sticking your fingers, I would certainly impale myself multiple times!!! Ellie looks fantastic and what a dream girl she is! Thank you again! :) xxx
ReplyDeleteHonestly Ginger I'm sure you'd have no problems making a wig like this, it's not hard, just hard on the fingers if you stab yourself ;)
DeleteThanks so much for your lovely comment, I am glad you enjoyed the tutorial and Ellie says thank you for the compliments too :)
xxx
This is a great tutorial! Makes me feel like I could do it!
ReplyDeleteEllie is really cute, in and out of this pretty wig!
Thanks! Jano
Thank you Jano, and I'm sure you could do it!!
DeleteThanks also on my little Ellie, she is a great model....very patient, especially having a plastic bag over her head ;)
xxx
Wow, I love it. I think I can do this...
ReplyDeleteThank you Judi! And YES you can!!!
Deletexxx
HI Sharon,
ReplyDeleteI happened to read your post about the Tibetan doll wig for Ellie and it was fascinating. I've made a few wigs like this before, but it's really fun to read your directions and take on things. You did an excellent job of explaining how to do it. I have a few pieces left and just might have to give this another try using your techniques...
Blessings, Jeanne
Thank you Jeanne! I'd say to use up those pieces before you forget where you put them ;) which is what I'd do!
DeleteI'm going to make another one in a day or so, I just want it to be less humid or the fur sticks all over my arms and makes me feel incredibly itchy and uncomfortable!
xxx
There seems to be NO end to your talents ....and how generous of you to share this with others (though I'm afraid that it's beyond my capabilities) who would like to have a go.
ReplyDeleteYou are really very kind Kendal, thank you!
DeleteI hope that people will make use of it and enjoy doing so, it's fun to make our own dolls wigs and very satisfying I have to add! So if you have any wide faced brunettes with falling hair who really want a new wig, just send them to me and I'll see what I can do...you have the address! LOL Nice try eh? ;)
xxx
Very informative tutorial . The wig looks great.
ReplyDeleteThank you very much Jolie, I'm glad you enjoyed it!
Deletexxx
That is so interesting and she looks beautiful. Viv
ReplyDeleteThanks very much Viv, I'm glad you found it interesting and thanks too on Ellie, she is one of my favourites I have to say!
Deletexxx
What an amazing tutorial. Thank you so much. It is detailed with wonderful photos. It makes me want to try and make one.
ReplyDeleteThank you so much Mylissa, I'm glad you enjoyed it. I hope you will give it a go some day, it's a lot of fun and very satisfying!
Deletexxx
Fantastic job!
ReplyDeleteThank you very much Shirly, I'm glad you think so.
Deletexxx
Awesome tutorial!! Thanks for sharing your secrets. Ellie looks adorable as usual and fantastic in her new beautiful curly wig! It's so neat to see how it's actually made. :)
ReplyDeleteThank you very much Farrah Lily, I'm glad you enjoyed it!
DeleteI really like the wig on Ellie but am not sure that it's actually 'her' if you know what I mean.....I need to get used to her looking so different!
xxx
This comment has been removed by the author.
ReplyDeleteWhere did you find the doll? It has the cutest face I've ever seen. I'm a red head with freckles. I love the wig.
ReplyDeleteVery informative tutorial, thank you very much and also thank you for the product information and links. Love your doll, she has such a sweet face. Could to share the brand name please.
ReplyDeletehello i have just found you via pinterest.i stupidly missed a dianna effner doll last week .but i would just like to say thankyou you have answered all my questions about fittinf a dolls wig in every detail take care .
ReplyDeleteThank you for your kind comment. I'm sorry that you missed an LD doll but hopefully another one that you like even more will come along again soon. I'm glad that this post of mine helped you with your questions.
DeleteHugs Sharon
Wow, cool post. I'd like to write like this too - taking time and real hard work to make a great article... but I put things off too much and never seem to get started. Thanks though. wholesale human hair wigs
ReplyDeletethank you very much! :)
DeleteПрелесть, спасибо!!!
ReplyDeleteThank you :)
DeleteThis was very informative thank you. Your doll is so beautiful
ReplyDeleteThank you for your kind comment, I'm glad that you found my tutorial informative. And thanks also for your nice words about my doll.
Deletex
Thank you so much for this tutorial, Sharon. I hope to be able to use it soon. Graz X
ReplyDeleteI'm so sorry that I didn't reply to this Graz, thank you! xx
DeleteThis was brilliant! So informative, love the pictures and thanks for your generous spirit! Sandra
ReplyDeleteI will be trying this for my little girls American girl doll 🥰 she got her when she was going through chemo and now that she has her hair back that has been one of her request for her baby to have hair also ❤️ thank you for sharin in so much detail!!
ReplyDeleteYou are very welcome. I hope your little girl will really enjoy her American Girl with her new hair. I recently rewigged one of my American Girls but I had to buy a wig because I can't get the lambswool very easily now here in Spain. Thanks again for visiting and I hope you have fun making the wig. xx
DeleteThanks 6 for a wonderfully clear and logical explanation, I really appreciate it.
ReplyDeleteYou're very welcome, I'm glad that you found it helpful. xx
DeleteRock star! Show us more show us more! you are a great instructor. So appreciated.
ReplyDelete