FOR SALE

Showing posts with label 18 inches. Show all posts

Sunday, 18 March 2018

My First American Girl......

For many years I've wanted to see an American Girl doll in real life.  But I never had....until now that is!

I've never liked dolls with a fabric torso and I dislike it when the cloth shows at the neckline in certain outfits, but I really like the Josefina face sculpt and their little legs, which I think are very cute.  I've looked at photos on Flickr, Pinterest and Ebay, sorely tempted but always put off at the thought of that fabric body.  Finally though I decided to give it a go and look for one to adopt.  I didn't want to spend too much money in case I didn't like her, so I decided to look again on Ebay and see what was on offer.

After a lot of research, I decided to bid on a secondhand Josefina being sold by someone in the UK.  I was fortunate enough to win the auction for a reasonable price and the doll arrived last Monday.  She appears to have been made by the Pleasant Company, probably before the company became a subsidiary of Mattel in, I believe, the year 1998.  I forgot to take a photo of the company name on the back of her neck, but will do that if it makes her easier to identify, because I'd love to narrow down when she may have been made.

Immediately on arrival,  I noticed that she was smaller than I expected....I'd sort of imagined these dolls as 'bigger' although I knew they were 18 inches tall!   I realised too how these dolls would be popular with young children as Josefina has a very squishy torso, I should imagine she'd be great to cuddle with.

So Josefina arrived.......


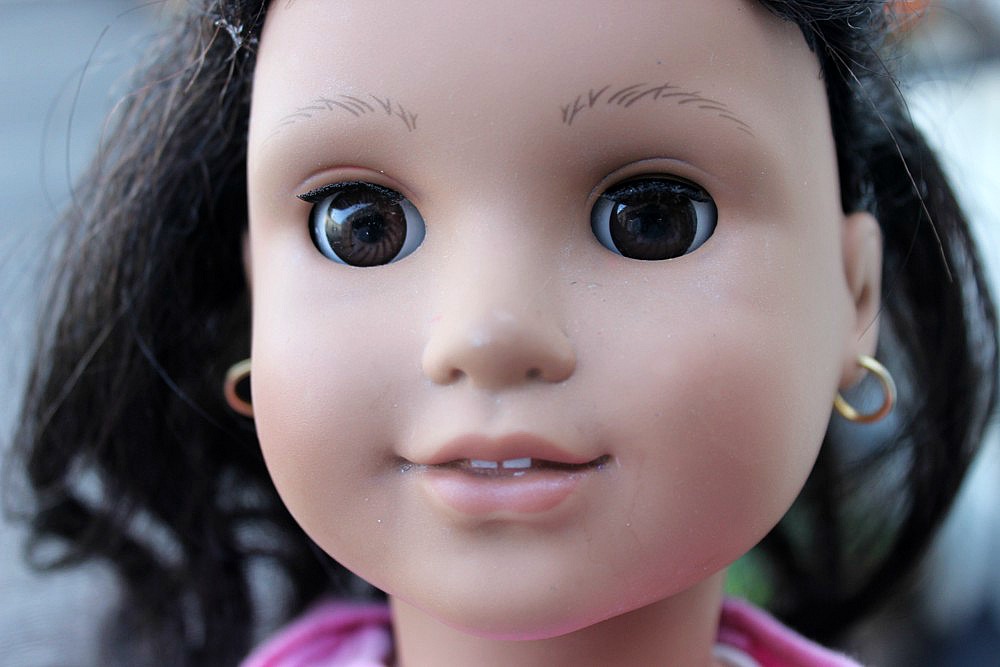
 she had a cute face with some surface dirt and a few scuffs......


And some white marks behind her pierced ears......


And a bit of glue residue in her hair......

And she had the most awful wig!  It felt really crunchy and dry, so that had to come off.


I removed it with great difficulty, it was glued on very securely and took a lot of tugging and a bit of swearing :) before finally I got it off her head!   You can see the surface dirt and scuffs better in the photos below, as well as the residue left behind by the wig.....


She has a very cute semi profile though......


Below, you can see what looks like additional glue has been applied to her head, just in one place, which makes me think a repair to her wig has been done at some point in the past.....


I love her profile and the colour of her vinyl.....


Here she is after a good scrub with washing up liquid.....you can see that I didn't have any luck removing the wig residue, it's stuck on very firmly! 


Despite the wash, obviously the scuffs remain.....


She has these sparse looking eyebrows drawn with individual hairs......


I haven't photographed her body but it does have a couple of clothing dye stains on the fabric, these were disclosed by the seller though, so no surprises there, and they'll be covered by her clothing anyway.

Once I'd put her head back on again (not too difficult as she has a string that tightens the cloth torso around the base of her neck) I looked in my wig stash for a suitable wig in her size.  Unfortunately, despite my massive amount of wigs, I really only had this one that fit her properly......


And I don't think it suits her at all!!!  So after washing and conditioning her original wig, I replaced that on her head but with the parting off to one side.  I then trimmed the horrible dry ends and put it into two bunches......


And dressed her in a dress I made from an American Girl pattern....I don't think it's her 'style', I'd prefer her to wear something more modern, but it fits....and looks OK for now, until I can make her something more suitable...... 


And finally we have a bit of sunshine!


Conclusion:  Well it's still early days, but so far I do quite like her.  I especially like her face and legs, which have always appealed to me from photos of American Girl dolls, plus I have a new appreciation of her little teeth and her profile.  I still don't like the fabric torso as I feel it's very limiting, but if I can always use patterns that have a reasonably high neckline, like the dress above, then that would be just fine.  I don't like this wig on her but having searched on Ebay, most of the wigs I've seen are very 'full' with too much hair, I'm sure that's NOT the look I'm after, so I will keep looking.

I'm glad I've not spent a fortune on buying my first American Girl, but admit that I'm still tempted to buy a new one at some point!  (Honestly, there's really no hope for me, is there!!!!)

Before I sign off, I'd just like to say a big thank you to Farrah Lily of Cozy Comforts and Dolls, for all her help in my quest to find an American Girl doll to bring home! 

Thank you for visiting, I hope you all have a great week ahead!

Big hugs Sharon xx


Monday, 23 January 2017

A 'crafty' weekend!

Last weekend I did a bit more sewing, this time making a dress for my Robert Tonner My Imagination doll who I'd read was a good fit for American Girl sewing patterns.  Well I have a ton of those so decided to make her a dress and I read correctly because the dress is a perfect fit on her. 


The pattern has short or long sleeves and a curved yoke at the front.  I guess I should have taken a photo without her jacket but it was a bit chilly ;)  The leggings are made from stretch fine corduroy and are my own pattern.  The jacket is a very cheap 'made in China' jacket that I've had for years, but I soaked it in diluted bleach and it looks much nicer now!


I do like this doll, she's lovely quality and it's great that she can wear so many of the patterns that I have but her eyes are a bit staring, so I might change them at some point.


I also made a wig for my Fairyland Minifee tanned Chloe.  I had ordered some alpaca from a seller on Etsy and had to wait for it to arrive from Estonia.  I made a hard wig cap and then I made the hair into wefts which I then attached to the head cap using PVA glue because it dries flexible and clear.  Using alpaca is a nightmare and it got everywhere!!!!  It's beautifully fine and soft but it got up my nose, in my eyelashes and all over my clothes and the floor!!! 

Anyway, the wig came out quite well for a first attempt until I decided she needed a fringe!  Oooops epic fail!  But I'm still happy with it and if I keep it 'messed up' like this, I think it suits her.  I love the colour and think the colour is really nice for her.  Would I make another?  I don't think I would in a hurry, no.  Apart from the alpaca being expensive, it's a very time consuming job and I realise now why sellers charge anything from £50 upwards for a custom made wig!


Tee shirt and jeans by me, canvas shoes by Dale Ray. 


Finally, although I didn't make this hat and coat set, I thought I'd share some photos of my little Gotz Happy Kid Emily (2016) wearing it.  I think it's made from real wool and has a faux fur collar and hat and is from the doll company Bonnie & Pearl.  It's great quality and the perfect fit on Emily.  (Leggings and boots made by me)


Thanks for visiting, I hope you all have a lovely week ahead and that you stay safe and warm.  It's been a bit nippy here in southern Spain recently but hopefully the temperature will be on the turn soon :)

Big hugs Sharon xx

Sunday, 14 February 2016

New project...New shoes!

Today I thought I'd take a little break from sewing and decided to make a pair of shoes.  The shoes I chose to make are for the 18 inch play dolls but I am thinking about adapting the pattern to make them in Sasha size, or maybe even Toddler size, although I might have to forgo some of the details as it might be too difficult to sew them in that small size.

I chose to make them in leather rather than the vinyl suggested in the pattern, but I think maybe vinyl would have been a lot easier to use.  For example the white leather parts are approx 2mm thick leather and that, along with the thinner brown leather of the body of the shoes, plus I lined the brown leather with stabiliser, my machine wasn't over keen on so many layers to sew through.

However, they are finished and although not perfect, I'm really pleased with how they came out!  Now to make some small laces for them :)  And of course some turquoise and white striped socks! :)


Hope you all had a lovely weekend and that the week ahead is a great one for you!


Saturday, 30 January 2016

Bonnie & Pearl

Just lately I became a little 'obsessed' with looking at the American Girl dolls.  I have so many patterns designed for that size of doll that I wanted someone who could wear them without alterations.

I looked and looked, on Ebay, Flickr and Pinterest, loads and loads of listings and photos.  I really like one of the American Girl faces, I think they call it the Josefina face sculpt, but unusually for me, I don't like the tan skin very much.  But the biggest problem with the American Girl dolls is....I really really do not like the all cloth body and the big 'American Footballer' shoulders.  (Sorry to those of you who love her, I guess we can't all like the same things!) So an American Girl wasn't for me.

Whilst looking on Flickr, I saw a photo of a Gotz Happy Kid Clara wearing a very pretty outfit and as these things go, one thing led to another and I found myself on the Bonnie & Pearl doll website....and there was a sale on!!!  Now I've always found the Bonnie & Pearl dolls interesting to look at and I like the fact that they are a British doll company, but I never liked the eyes.  The dolls come with a'sleep' eyes and they are a bit too 'staring' for my taste.  But it went through my mind that maybe I could change them!!!  I went to look at the doll which is my favourite, a dark skinned girl with black affro style hair, and lo and behold, she was on sale at 30% off her normal price!!!   So I decided to order her.  AND three outfits too because they too were on sale.  I mean, it would be a sin not to, wouldn't it?!  And just think of all the money I save! :D

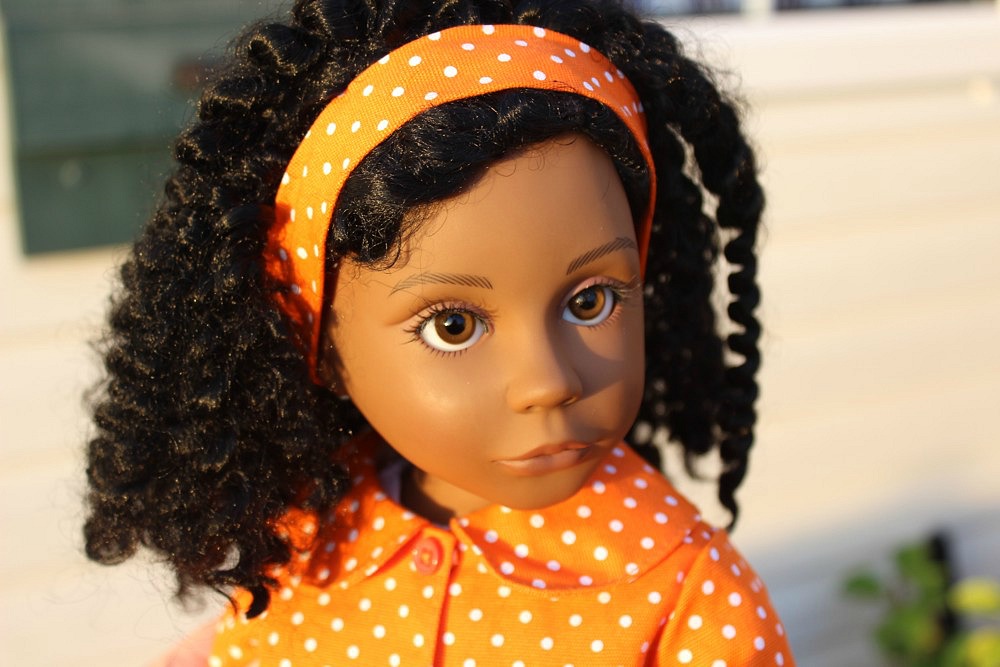
My order arrived several days ago and I have to say that I was very pleasantly surprised!  The doll is lovely!  She's much prettier in real life than her photos would have me believe.  The quality is excellent, she is mostly vinyl with a vinyl chest plate but her lower torso is cloth.  Her default outfit is made up of many pieces and the three outfits I ordered with her were so nicely presented, each in it's own individual box.  The doll herself is nice and heavy with lovely smooth vinyl which is a gorgeous coffee colour.  She has an unusual face which in this 'skin tone' makes her look very exotic. 

I decided to change Claudia's eyes straight away to glass ones, completely removing the sleep mechanism and  now I'm even more happy with how she looks.

Below are photos of Claudia with her new eyes and wearing one of the outfits I bought for her.  The outfit consists of the lovely orange polka dot jacket with matching hairband, white short sleeved tee shirt, frilled denim skirt with faux suede belt, white underwear and brown faux suede boots!!  A great outfit for this girl I'm sure you'll agree!  (I added the socks)

I will show other outfits in other posts as she wears them!

(OOoops!  I realised after uploading these photos that I really should have ironed the skirt!)


 I hope you've enjoyed meeting this new little girl, who as yet hasn't told me her name, and I hope you all are enjoying your weekend!

Thanks for visiting :)


Friday, 13 November 2015

A Journey Girl Kyla from Toys R Us.....

When I was in the UK, Dee very kindly took me to Toys R Us after the Chat n Snap and before we went for our lovely Italian meal.  I wanted to have a look at the play dolls called Journey Girls which are exclusive to them.  Although the Stevenage Toys R Us didn't have a very big selection (I understand this is not uncommon in the UK, compared to the US stores who have loads of dolls and outfits available),  I decided to get a tanned skin Kyla because I'd been looking at her on the internet.  At £30 each, I thought this doll was a good candidate for a 'makeover' because as I've mentioned previously here in my blog, I really do enjoy customising dolls.

I won't do a box opening because I left all the packaging in the UK, but will just show you the dolls face before and afterwards.  I had thought about removing her eyes before working on her, not to replace the eyes, because I wanted to keep them as they are pretty, but to make it easier using the sealant on her face, but having discussed it with the owner of Journey Girl Adventures Blogspot I decided to leave the eyes in place and just cover them.  This made attaching new eyelashes a bit more of a challenge but I was able to do it in the end!

Journey Girls are about 18 inches tall and are made of vinyl except for their waist, hips and bottom area which is made of cloth.  They have the usual 5 points of articulation and the head can be moved up and down slightly.  Their hair is rooted and in the case of my doll is very soft and silky.  I like that the doll has a vinyl chest plate, she looks so much nicer in strappy tops and anything that has a slightly lower neckline.  If there's one thing I really cannot stand and that is where a soft bodied doll has an outfit that shows their cloth body!

So here are some before photos.  The first photos show her as she came, you can see that she is already a pretty little thing!   Her lips were quite 'solid' and dark, a sort of dark plummy colour.  I didn't think they looked horrible but I just wanted a different colour with more definition.


Here you can see a close up of her lips:


I also wanted to do something with her eyebrows which were very simply done, with thin 'hairs' going in one direction and very sparsely drawn.  Also her eyelashes were the stiff plasticy ones that a lot of play dolls come with.  I decided they needed to go too.  I like her eyes, they are acrylic but are very detailed and a pretty colour which really suits her:


I wanted to keep her eyebrows in the same position so decided to enhance them rather than start from scratch.  Here she is with her eyelashes and her lip paint removed:


As you can see she has tiny bottom lashes and, as well as the plasticy lashes that I'd removed,  she has some painted on upper lashes too.


Before using any sealant I covered her hair with a plastic bag to protect it and then put some masking tape over her eyes.  If the sealant were to go on the acrylic eyes it would make them very dull, which I didn't want!


I intended taking photos as I went along but as luck would have it, a friend of ours arrived and I forgot!  So I will tell you what I did and show the final results.

After spraying the dolls face with a thin layer of sealant, (I like to use Mr Super Clear Flat but be sure to always use in a very well ventilated area.....I only ever use mine outside) I used a deep brown artist quality chalk pastel and a thin brush and filled in the eyebrows with shading.  I wanted them to look denser, like real eyebrows.  Normally at this stage I would spray again with sealant but I wanted to keep the layers to a minimum as the sealant can make the darker vinyl look paler and I didn't want to risk that.  So then, taking a very sharp watercolour pencil, I added extra eyelashes, drawing the fine lines in a different direction to the existing eyebrows.

Then using a black watercolour pencil, I added more bottom eyelashes (I am actually going to add some more tomorrow but took the 'after' photos prematurely!).

I used finely shaved chalk pastels to shade the lips, I used several shades of reds and pink and built the colour up in layers.  I added a little bit of white to the middle of the top and bottom lips.  I then added fine lines in white watercolour pencil, these are supposed to replicate the lines in human lips! ;)  I dusted the lips again with rosy shades just to soften the pencil lines.  I didn't want them to look too 'obvious'.

After I was happy with the lips I blushed her face, again using fine chalk pastels.  I used a flat but wide brush and did the usual places, chin, bridge of nose, forehead, temples, around the nostrils (just a little, you don't want your doll to look like she has a cold) and finally the cheeks.

Once I was happy with the depth of shading and blush, I sealed it all again.

And finally I added human false eyelashes.  One human eyelash strip will do the two eyes, you just fold it in half length wise and cut in half.  I used Ailene's Tacky Glue and used the tiniest bit on the innermost edge of the upper lids, let the glue go slightly tacky and then apply the lashes with a cocktail stick.  Any glue that got on the acrylic eyes was easily wiped away with a cotton bud.

And here is the end result, I hope you like how she looks!  She is wearing a Gotz outfit that I got on Ebay last year.  I think it suits her.  Her sandals are her default ones, I didn't have shoes that both fitted her AND went with her outfit!  (The lines you see on her face in some of my photos are just shadows from the fence, which unfortunately were unavoidable when the sun was low in the sky this evening, but I thought I'd use them regardless!)


I hope you've enjoyed seeing Kyla getting her makeover.  She was fun to do and I'm happy with how she has turned out!

I hope you all have a lovely weekend, thank you for visiting!